Battery switch on travel trailer function is crucial for managing power from your tow vehicle and your trailer’s house battery. Understanding how it works is key to preventing electrical issues and maximizing your RV’s battery life. This guide breaks down the functionality, troubleshooting, and best practices for using your travel trailer’s battery switch, ensuring smooth and safe power management on your adventures.
We’ll cover various switch types, wiring diagrams, common problems (like corrosion), and how to diagnose them. Learn about maximizing battery life, integrating solar panels and inverters, and essential safety precautions. We’ll even provide a handy troubleshooting flowchart to help you navigate any issues you might encounter.
Understanding Battery Switch Functionality in Travel Trailers
Your travel trailer’s battery switch is a crucial component for managing power from your house batteries (used for interior lights, appliances, etc.) and your vehicle’s battery (used for starting your tow vehicle). Understanding how it works is essential for safe and efficient RVing. This section will explain the different types, wiring, and proper usage.
Battery Switch Types
Travel trailers typically use one of two main types of battery switches: a simple on/off switch or a more sophisticated multi-position switch. A simple on/off switch connects or disconnects your house batteries from the trailer’s electrical system. Multi-position switches offer more control, often allowing you to connect both the house and vehicle batteries, only the house batteries, or neither.
Some advanced switches even include a “battery combiner” function, automatically connecting the batteries when the vehicle is running to charge the house batteries.
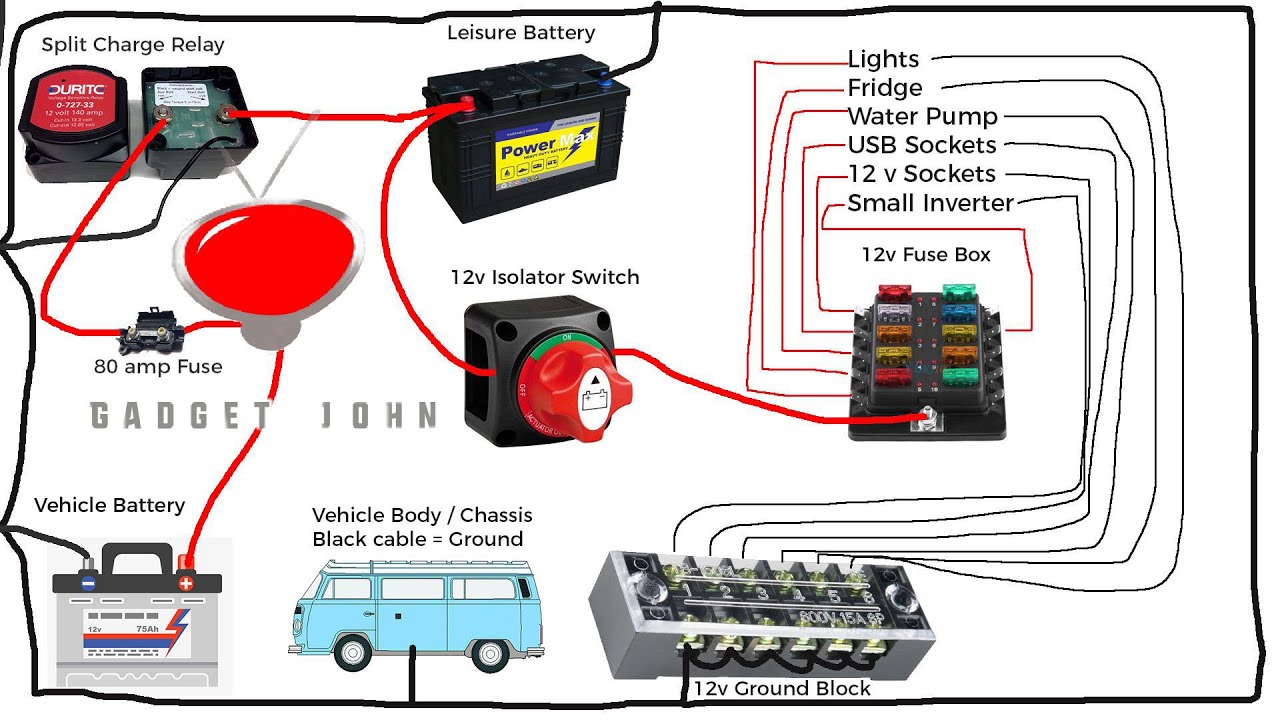
Typical Wiring Diagrams
A basic wiring diagram for a simple on/off switch shows a single switch controlling the power flow from the house batteries to the trailer’s 12V system. More complex diagrams for multi-position switches show multiple connections, often including a fuse or circuit breaker for safety. The vehicle battery typically connects to the trailer’s charging system, which then charges the house batteries when the vehicle is running.
A common configuration uses a 7-pin or 7-way RV connector for power transfer between the tow vehicle and the trailer. This connector carries the 12V charging power to the trailer. The wiring diagram will vary depending on the specific components and features of the trailer. Always consult your trailer’s manual for the correct wiring diagram.
Battery Switch Role in Power Management
The battery switch acts as the central control for your trailer’s 12V power. It prevents accidental drainage of your vehicle’s battery by isolating the house batteries when not in use. When you want to use the trailer’s appliances, you engage the switch, allowing power to flow from the house batteries. If you have a multi-position switch with a combiner, you can charge your house batteries from your vehicle’s battery while driving, ensuring you have sufficient power for your next adventure.
Proper Battery Switch Usage, Battery switch on travel trailer function
Proper usage of your battery switch is vital for preventing battery drain and ensuring your system’s longevity. Here’s a step-by-step guide:
- Before disconnecting from your tow vehicle: Turn off all appliances and lights in the trailer. This prevents unnecessary drain on the house batteries while disconnected.
- Turn off the battery switch: This isolates the house batteries from the trailer’s electrical system, preventing accidental discharge.
- While connected to your tow vehicle: You can use the battery switch to select the appropriate setting based on your needs. This could involve connecting both batteries to power appliances while charging the house batteries, or only connecting the house batteries for powering appliances.
- When using the trailer’s appliances: Turn on the appropriate switch setting to supply power to the trailer’s 12V system from the house batteries.
- Regularly check your battery levels: Monitor your battery levels to ensure they are adequately charged and address any issues promptly.
Troubleshooting Common Battery Switch Issues
Your travel trailer’s battery switch is a critical component, ensuring you can easily switch between your trailer battery and your tow vehicle’s charging system. Problems with this switch can leave you stranded without power. Understanding how to troubleshoot these issues is crucial for maintaining your RV’s functionality.
Identifying Common Battery Switch Problems
Common problems with battery switches stem from two main culprits: corrosion and loose connections. Corrosion builds up over time due to exposure to the elements and battery acid fumes, hindering the flow of electricity. Loose connections, often caused by vibration during travel, create intermittent power or complete failure. These issues can manifest as dim lights, malfunctioning appliances, or a complete lack of power.
Regular inspection is key to preventing these problems from escalating.
Diagnosing a Faulty Battery Switch with a Multimeter
A multimeter is an invaluable tool for diagnosing battery switch problems. First, ensure your multimeter is set to measure DC voltage. Then, check the voltage at the battery terminals. If you’re reading a voltage close to the battery’s rated voltage (e.g., 12.6V for a 12V battery), the battery itself is likely fine. Next, check the voltage at the output terminals of the battery switch.
A significant voltage drop (more than 0.5V) between the battery terminals and the switch output indicates a problem within the switch or its connections. If the voltage at the output terminals is near zero, regardless of the switch position, the switch is likely faulty.
Cleaning and Maintaining Battery Switch Connections
Cleaning corroded connections is a straightforward process. Begin by disconnecting the battery’s negative terminal to prevent accidental shorts. Use a wire brush or sandpaper to remove corrosion from the terminals and the switch connection points. A baking soda and water paste can also be effective in neutralizing acid buildup. After cleaning, apply a dielectric grease to the terminals and connections to prevent future corrosion.
So, you’re an audiophile who loves to travel? Awesome! Check out this guide on creating the perfect audiophile travel setup to ensure your tunes sound amazing on the go. Then, if you’re hitting the road in an RV, understanding your battery switch on travel trailer function is crucial for powering all your gear – including that awesome portable audio system! Knowing how to manage your power is key to a smooth and enjoyable trip.
Tighten all connections securely, ensuring a firm and clean contact. Regularly inspect and clean these connections to prevent future issues.
Replacing a Faulty Battery Switch
Replacing a faulty battery switch is relatively simple. First, disconnect the negative battery terminal. Then, carefully disconnect all wires from the old switch, taking note of their positions. It’s helpful to take photos before disconnecting to aid reassembly. Install the new switch, ensuring that all wires are correctly connected.
Reconnect the negative terminal and test the switch functionality. If you are uncomfortable with this process, it’s always best to consult a qualified RV technician.
Troubleshooting Flowchart
| Problem | Diagnosis | Solution |
|---|---|---|
| No power to appliances | Check battery voltage; check switch output voltage with multimeter. | Clean and tighten connections; replace faulty switch. |
| Intermittent power | Inspect connections for looseness or corrosion. | Tighten loose connections; clean corroded connections. |
| Low voltage at appliances | Check voltage drop across switch with multimeter. | Replace faulty switch; check for wiring issues. |
Battery Switch and Power Management Strategies
Smartly using your battery switch is key to extending the life of your RV batteries and ensuring you have power when you need it. Understanding how your batteries charge and which type you have is equally crucial for efficient power management.Effective power management hinges on understanding your trailer’s power consumption and making informed choices about appliance usage. By combining careful planning with knowledge of your system, you can significantly improve your off-grid experience.
Battery Charging Systems
Your travel trailer likely uses a combination of charging sources: the alternator in your tow vehicle, a shore power connection (120V AC), and possibly solar panels. Understanding how these interact is vital. The alternator charges the batteries while driving, shore power charges them when plugged into a campsite, and solar panels provide a sustainable charging option when boondocking. A properly functioning charging system will ensure your batteries are consistently topped up, preventing premature wear and tear.
Different charging systems might employ different voltage and amperage levels, which can impact charging speed and battery health. For example, a three-stage charging system (bulk, absorption, float) is generally considered optimal for lead-acid batteries, offering a more controlled and efficient charge.
Comparison of Battery Types
Several battery types are common in travel trailers, each with advantages and disadvantages. Lead-acid batteries (flooded, gel, AGM) are the most prevalent due to their relatively low cost. However, lithium-ion batteries are increasingly popular because of their lighter weight, longer lifespan, and higher energy density. Flooded lead-acid batteries require more maintenance (checking water levels), while gel and AGM batteries are sealed and maintenance-free.
So, you’re an audiophile who loves to travel? Awesome! Check out this guide on audiophile travel setups to make sure your tunes sound amazing wherever you go. Then, if you’re hitting the road in an RV, understanding your battery switch on travel trailer function is crucial for keeping your music playing and your lights on.
Knowing how to manage your power is key to a smooth and enjoyable trip, especially if you plan on using your fancy portable audio equipment.
Lithium batteries offer superior performance but come with a higher initial investment. Choosing the right battery type depends on your budget, power needs, and maintenance preferences. For instance, a boondocking enthusiast might opt for the higher cost and performance of lithium batteries for extended off-grid use, while someone primarily using campsites might choose the more economical lead-acid option.
Travel Trailer Appliance Power Consumption
This table shows the approximate power consumption of common appliances. These values can vary based on the specific model and usage.
| Appliance | Wattage | Amperage (12V) | Amperage (120V) |
|---|---|---|---|
| Refrigerator (12V) | 75-150 | 6.25-12.5 | – |
| Refrigerator (120V) | 100-150 | – | 0.83-1.25 |
| Air Conditioner | 1500-2000 | – | 12.5-16.7 |
| Microwave Oven | 1000-1200 | – | 8.33-10 |
| Water Heater (electric) | 1500 | – | 12.5 |
| TV | 50-100 | – | 0.42-0.83 |
| Laptop | 45-65 | – | 0.38-0.54 |
| LED Lighting (interior) | 10-30 per fixture | 0.83-2.5 per fixture | – |
Safety Precautions and Best Practices
Working with batteries and electrical systems in your travel trailer requires careful attention to safety. Improper handling can lead to serious injury or damage to your equipment. This section Artikels essential safety precautions and best practices to ensure a safe and efficient experience.
Essential Safety Equipment and Tools
Proper tools and safety equipment are crucial for any battery switch maintenance. Failing to use them can increase the risk of accidents. The following list includes the minimum necessary items for safe operation.
- Safety glasses: Protect your eyes from sparks, acid splashes, and other debris.
- Rubber gloves: Insulate your hands from electrical shocks and battery acid.
- Heavy-duty insulated tools: Use tools with insulated handles to prevent electrical shocks. Screwdrivers, wrenches, and pliers should all be insulated.
- Baking soda and water: Neutralize any battery acid spills.
- Ventilation: Ensure adequate ventilation to prevent the buildup of explosive hydrogen gas.
Preventing Battery Corrosion and Ensuring Proper Ventilation
Battery corrosion is a common problem that can reduce battery life and create safety hazards. Proper ventilation is also critical for preventing the buildup of explosive hydrogen gas.
- Clean battery terminals regularly: Use a wire brush or terminal cleaner to remove corrosion buildup. Apply a corrosion inhibitor to prevent future corrosion.
- Check for leaks: Regularly inspect your batteries for any signs of leaks or damage. Address any issues immediately.
- Ensure adequate ventilation: Batteries should be located in a well-ventilated area to allow for the dissipation of hydrogen gas. Never work on batteries in an enclosed space.
- Use battery terminal protectors: These prevent corrosion and accidental short circuits.
Potential Hazards of Improper Battery Switch Use
Improper use of the battery switch can lead to several hazards, including damage to your electrical system and personal injury. Understanding these potential problems is key to safe operation.
- Electrical shocks: Improper handling of battery connections or working on a live system can result in serious electrical shocks.
- Battery explosions: Hydrogen gas buildup can cause batteries to explode if not properly ventilated. Sparks near batteries can also ignite this gas.
- Acid burns: Battery acid is corrosive and can cause severe burns to skin and eyes.
- Fire hazards: Improper wiring or short circuits can lead to fires.
- Damage to electrical components: Incorrect switch operation can damage sensitive electronic components in your RV.
Battery Switch Integration with Solar Panels and Inverters
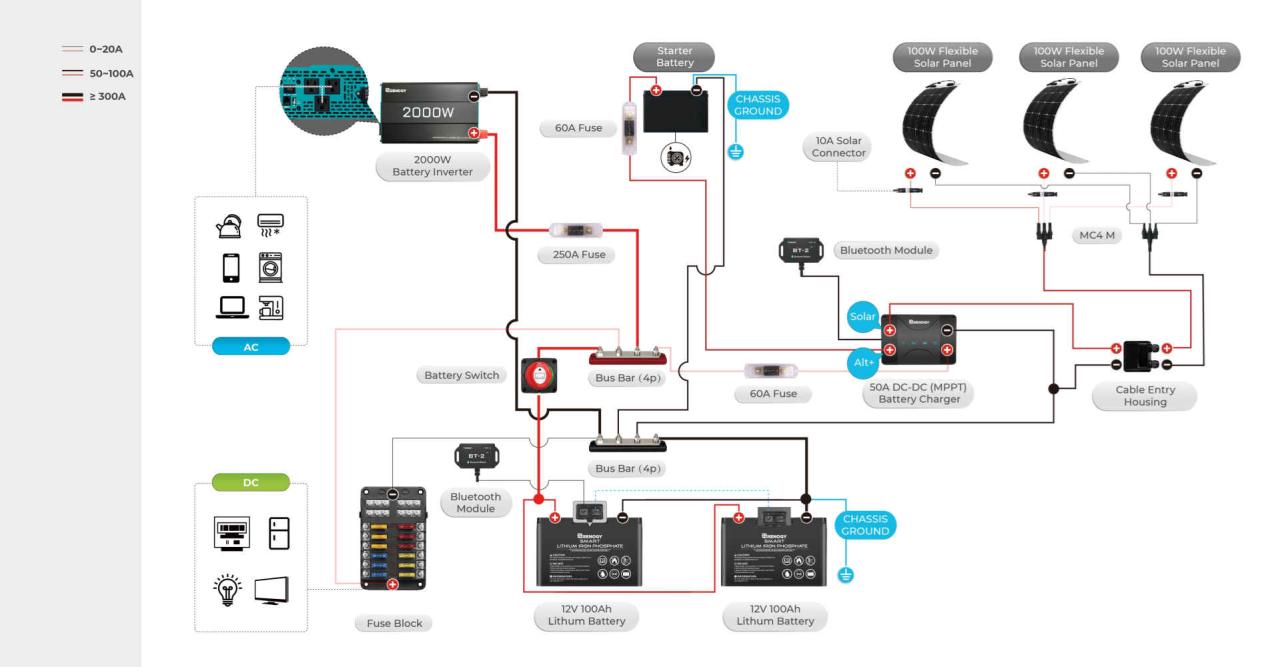
Integrating solar panels and inverters into your travel trailer’s electrical system is a great way to boost power and reduce reliance on shore power or your generator. The battery switch plays a crucial role in managing the flow of power from these various sources. Understanding how these components work together is key to maximizing your off-grid capabilities.This section details how your battery switch interacts with solar panels and inverters, explaining the role of charge controllers and providing a visual representation of the electrical flow.
Charge Controller Function
The charge controller is the brains of the operation, preventing overcharging and ensuring your batteries receive the optimal amount of power from your solar panels. It acts as a regulator, monitoring the voltage and current from the solar panels and adjusting the charging rate accordingly to protect your batteries from damage. Different types of charge controllers exist (PWM and MPPT), each with its own efficiency characteristics, but the basic function remains the same: to safely manage the solar energy input to your battery bank.
Without a charge controller, your batteries could be overcharged and potentially damaged, shortening their lifespan.
Power Flow from Solar Panels to Trailer Appliances
Electricity generated by your solar panels flows first to the charge controller. The charge controller then regulates this power and sends it to your battery bank. From the batteries, the power is available through your battery switch. When the switch is in the “on” position for your house batteries, power from the batteries (now potentially supplemented by solar) is available to your trailer’s 12V DC system.
If you need AC power, the power from your batteries (again, potentially boosted by solar) goes to the inverter, which converts the DC power to AC power for your appliances. This entire process is managed by the battery switch, which controls the flow of power from your batteries to your trailer’s electrical system. The battery switch acts as a central hub, allowing you to selectively use power from your batteries, or isolate them for maintenance or safety.
System Diagram
Imagine a simple diagram. At the left, you have your solar panels, connected by wires to a charge controller. The charge controller is then connected to your battery bank. From your battery bank, wires lead to your battery switch. From the battery switch, one set of wires goes to the 12V DC system of your trailer (lights, water pump, etc.). Another set of wires from the battery switch goes to your inverter. Finally, the inverter is connected to the AC power outlets in your trailer. The arrows on the lines indicate the direction of the electrical flow. This clearly shows how the battery switch acts as a central control point for all power sources and loads.
Types of Battery Switches and their Features: Battery Switch On Travel Trailer Function
Choosing the right battery switch for your travel trailer is crucial for efficient power management and preventing electrical issues. Different types of switches offer varying levels of control and complexity, each suited to specific needs and setups. Understanding their features and limitations will help you make an informed decision.
Battery switches are the gatekeepers of your trailer’s power, controlling the flow of electricity from your batteries to your appliances and systems. The most common types are single-pole, double-pole, and dual-battery switches. Each offers a unique set of capabilities and limitations, impacting your trailer’s power management capabilities and overall convenience.
Single-Pole Battery Switches
Single-pole switches are the simplest type. They offer a single on/off switch for a single battery. This is suitable for trailers with only one battery and basic power needs. They’re inexpensive and easy to install, making them a good option for smaller setups or as a simple disconnect switch. However, they lack the versatility of more advanced options.
Double-Pole Battery Switches
Double-pole switches control two separate circuits from a single battery. This allows for greater control, separating, for example, your house battery bank from your starting battery. This is useful for preventing accidental draining of your starting battery, essential for engine cranking. They’re more complex than single-pole switches but offer improved safety and management.
Dual-Battery Switches
Dual-battery switches are designed to manage two separate batteries, typically a house battery and a starting battery. They usually provide several positions: “Both” (combining both batteries), “House,” “Start,” and “Off.” This gives you complete control over which battery or combination powers your trailer systems. This type offers the most flexibility and control, ideal for larger trailers with extensive power demands and multiple battery banks.
Selecting the Appropriate Battery Switch
The best battery switch depends on your trailer’s specific configuration and power needs. A single-pole switch is sufficient for a small trailer with a single battery, while a dual-battery switch is recommended for larger trailers with separate house and starting batteries, especially those with high power demands from inverters or solar systems.
Key Specifications to Consider When Selecting a Battery Switch
Before purchasing a battery switch, it’s vital to consider these key specifications to ensure compatibility and longevity:
- Amperage Rating: The switch must handle the maximum amperage draw of your system. Choose a switch with a higher amperage rating than your expected load to ensure safety and prevent overheating.
- Voltage Rating: The switch must be compatible with your battery’s voltage (typically 12V).
- Number of Poles: Select the appropriate number of poles based on your battery configuration and power management requirements (single-pole, double-pole, or dual-battery).
- Switch Type: Consider the type of switch mechanism (e.g., rotary, rocker). Rotary switches are often preferred for their clear indication of the selected position.
- Mounting Style: Ensure the switch’s mounting style is compatible with your trailer’s panel or installation location.
- Protection Features: Look for switches with built-in overload protection to prevent damage to the switch and your electrical system.
Mastering your travel trailer’s battery switch is essential for a worry-free RV experience. By understanding its function, troubleshooting common problems, and following safety guidelines, you’ll ensure reliable power and extend the life of your batteries. Remember, proper maintenance and understanding of your system are key to enjoying your adventures without electrical headaches. So get out there and explore!
General Inquiries
What type of multimeter do I need to test my battery switch?
A basic multimeter with the ability to test voltage and continuity is sufficient for most battery switch troubleshooting.
How often should I clean my battery switch connections?
Inspect and clean your battery switch connections at least once a year, or more frequently if you notice corrosion or performance issues.
Can I use my travel trailer’s appliances while driving?
This depends on your setup. Using the tow vehicle’s battery to power trailer appliances while driving is generally not recommended due to potential drain on the vehicle’s battery.
What are the signs of a bad battery switch?
Signs include flickering lights, no power to certain appliances, blown fuses, or a noticeably hot battery switch itself.
